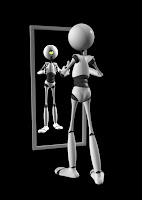
Here is a demo reel showing three of the illusion renders and a pre-vis of my unicycle rig. I like the unicycle rig a bit more because I could connect the movement of the legs to the master control so when the master control is moving in one direction the legs will move to that direct.
Monday 28 June 2010
Unit 6: Bonus Tutorials, More Different Lighting Tutorials
This tutorials shows more different ways of using lights to make the rendered scene more effective.
The first two images are a group spot light rig. By grouping the spot lights the area can have a big sharp brightness or a solid grey softness.


The second two images are showing one of the functions the spot light have which is giving the spot light soft edges and adding a picture to give the scenery more atmosphere. I used the Mona Lisa because I didn't have the image Alan was using in the tutorial video.


The third image is show the uses of area lights.

The final image shows more different uses of point lights.

Unit 6: Bonus Tutorial, Point Lights
For this tutorial I have learnt different ways of using the point lights in maya, giving the room different type of lighting. The first image has four points lights lighting up the room, the second has six point lights, the third has 8 point lights and the last image has 12 point lights.


Tuesday 22 June 2010
Unit 6: Renders
I have finished almost all of the rendering tutorials, I haven't done the 3D render tutorial because I don't have and 3D lenses. After learning the render tutorials I found after effects very interesting so maybe I might do some after effects animation soon.


Monday 21 June 2010
Unit 6: Deformers animation/controls
In this tutorial I was learning the uses of deformers.
Deformers are used to add a bit more life to the model by either giving it some jiggleness to them, or changing the objects shape with a lattice or wire deformers.
First I learnt about wire deformers. Wire deformers is just a curve that has an influence over an object and can be used to add a bit more depth to them like adding veins to an arm or creating mountains. The wire deformer can also be used to control movements of an eye brow.
Here is my deformer demo rile showing the different types of deformers that gives a bit of life to the objects enjoy.
Deformers are used to add a bit more life to the model by either giving it some jiggleness to them, or changing the objects shape with a lattice or wire deformers.
First I learnt about wire deformers. Wire deformers is just a curve that has an influence over an object and can be used to add a bit more depth to them like adding veins to an arm or creating mountains. The wire deformer can also be used to control movements of an eye brow.

Here is my deformer demo rile showing the different types of deformers that gives a bit of life to the objects enjoy.
Sunday 20 June 2010
FOR ALAN
I can't find the scene that only has zax for the render tutorial titled: Render_Layers_YEAR_1. do you know where it is?
Unit 6 Tutorial: Binding Influence
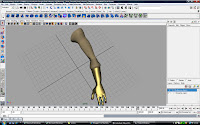
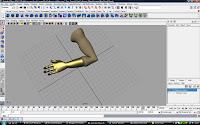
In this tutorial I learnt how to make an elbow bend look natural. To do this you need to assign objects to certain part of the rig.
First animate an arm bending and and un bending, then create a nurb plane, rotate it 90 degrees and make a group.
Parent the group to the elbow joint rig. Next assign the arm mesh to the nurb plane. Next set key the position of the plane, the reason for this is when weight painting the influence of the arm mesh to the nurb plane it will have to stretch out the area of the mesh it has influence over given it an elbow like appearance.
Next to the weight painting around the elbow area of the arm mesh to the nurb plane, adding how much influence the nurb plane has over the elbow area.
Next create a nurb sphere and do the grouping and parenting process again but instead of parenting the nurb sphere to the elbow joint parent it to the shoulder joint.
Move the position of the nurb sphere near inside the center of the bicep area of the arm and change it's shape to an oval. Skin the nurb sphere to the arm mesh and pull the nurb sphere just about out of the arm mesh and start weight painting the bicep area of the mesh to the nurb sphere. Finally move the nurb sphere back inside the arm mesh and set key the nurb sphere moving to the edge and moving back in the center of the mesh when every the arm bends to give it a bulge like when a real arm bends.


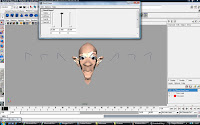
Unit 6 Tutorial: Blend Shapes
Blend Shapes are used to morph an object into a different on. It's like parenting but only changing the objects apperance throuh vertices.
This is helpful when lip syncing a model, giving it eye brow movement and adding a streachyness to the mouth when opened.
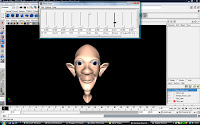
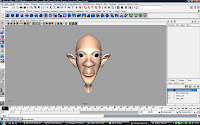
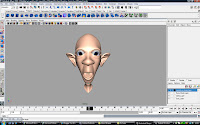
Blend shapes can also save time remodeling the eye brow on the other side of the face by duplicating the main head twice and an altered head, example an eybrow that's risen. Rename one of the heads base and the other inverese and name the risen eye brow head bshape(blend shape). Flip the inverse head and get it roughly in the same position as the base head. Next you need to wrap them by selecting base then inverse and apply the wrap deformer. Next apply a blend shape by selecting the bshape head then the inverse head. Finally bring up the blend shape animation editor window and set the influence as high as it can then select the base head and delete its history. Sounds long but it is not, this will save time resculpting the other side of the face.

This is helpful when lip syncing a model, giving it eye brow movement and adding a streachyness to the mouth when opened.


Blend shapes can also save time remodeling the eye brow on the other side of the face by duplicating the main head twice and an altered head, example an eybrow that's risen. Rename one of the heads base and the other inverese and name the risen eye brow head bshape(blend shape). Flip the inverse head and get it roughly in the same position as the base head. Next you need to wrap them by selecting base then inverse and apply the wrap deformer. Next apply a blend shape by selecting the bshape head then the inverse head. Finally bring up the blend shape animation editor window and set the influence as high as it can then select the base head and delete its history. Sounds long but it is not, this will save time resculpting the other side of the face.

Tuesday 15 June 2010
Finished three Rigging tutorials: Skinning Rig, Weight Painting Rig & Binding Rig
I finally finished all three of the main rigging tutorials.

The first tutorial was the Skinning Rig. This rigging techniques uses the components to assign the vertexes to a chosen joint by adding, if the influence was subtracted then the influence would be set to a different joint at random.
Second tutorial was the Weight Paint Rig. This is used to set the amount of influence to a joint in more detail by painting and setting how much influence the joint should have.
The last tutorial was the Binding Rig. The binding rig is used for deforming when something (like a finger) bends or having a bicep to grow when flexing you muscles.
Out of all the rigs I would mostly use the weight paint because of how I can set how much influence a joint should have and have a nice bend on a limb.
Friday 11 June 2010
I got a NEW template for my blog
here it is my new template, let me know what all of you think, even you phil. I do need help with the layout of my blog like, changing the size of the font of my title and adding a search bar.
well hope everyone is having a nice day.
well hope everyone is having a nice day.
Wednesday 9 June 2010
The Terrified Glove animation EDIT
Here is my glove animation this time with sound and an opening title and closing credit.
I felt that the music really suit the atmosphere of my animation, giving it a slight silliness to it.
I felt that the music really suit the atmosphere of my animation, giving it a slight silliness to it.
Tuesday 8 June 2010
The Terrified Glove animation
Today I have finally finished my terrified glove animation, there is no souind but I will add it later. The main story is about my glove exploring it's environment.
I was glad tat I was able to finish this animation, now all I have to do is finish off all of Alan's tutorials.
I was glad tat I was able to finish this animation, now all I have to do is finish off all of Alan's tutorials.
Subscribe to:
Posts (Atom)